Monday, June 21, 2021

Honda N600 Sedan Front Seat Re-upholstery

Ever since getting this n600, I have wanted to redo the front seat covers.  Don't get me wrong, I love a good duct tape job, but as I've continue to refresh the interior of the car, the worn front seats kept sticking out like a sore thumb.  


I remember posts from the Yahoo! Group (before Yahoo! ended it) had options for new covers for the original seats, so the idea had always been in the back of my mind to just get a set of replacement covers.  Well, that time had finally arrived.  Luckily, I'd been in touch with Bill Colford via facebook on other pieces of this project.  He helped out by contacting the upholstery shop that has the patterns for these reproduction covers.  Additionally, he let me know there were choices on which design I wanted to get.


I went with the second picture (the one that has the design flare out).  This was the design that best matched the rest of the interior.  


Installation was pretty easy, just take your time!  Remove the seats from car but unbolting them from the 4 nuts from under the vehicle.  Undo the metal fasteners from the seat base to remove the cover and separate it from the foam.  I ended up wrapping the original foam with a layer of white foam batting from my local Jo-Ann's and applied Tacky Spray adhesive in order to secure the batting, foam, and new cover.  This was also to contain the deteriorating yellow foam from falling out from under the seat and collecting in the carpet below. 

For the seat back, there are 6 metal tabs near the base that can be unbent in order to loosen up the cover.  For reinstallation, I turned the new seat back cover inside out and put extra batting at the top to cover the seat head rest mounting slot because I didn't want to install them.  I rolled the seat cover down and sprayed the adhesive as I went along.  I also wrapped the seat back yellow foam with batting, and it resulted in a little bit more fluffy, comfortable feel to the seat.  Not sure if the seat covers needed to be installed on specific sides, driver or pass, but they looked close enough to me.  Very pleased with how they turned out.  


Saturday, June 20, 2020

N600 Windshield Replacement

When I bought this N600 back in 2010, it had a crack in the upper corner of the passenger side.  I knew a replacement would be necessary, but I also knew that windshields for the N600 were difficult to source.  So, I turned to Japan to see the likelihood of an N360 windshield to fit on an N600 would be.   Willing to take the risk, I had one shipped over after finding a used one.  Originally obtained in 2013, it has sat wrapped in bubble wrap and within its shipping box since then.  Also, at around the same time.  I purchased the locking strip windshield seal from Kevin Keough on ebay.  Both have been sitting... waiting to be installed.  Overly cautious, I sought out suggestions from the 2cylinderhondas group since this was my first attempt at swapping out a windshield. 

As always, Miles was super helpful and even provided detailed pictures on how to fit the gasket to the window first, glue then ends, then fit to the car before trying to install the windshield.  Along the way, I discovered that the gasket that I removed was not the same as the gasket I received from Kevin (the correct one), so I had to adjust my planned installation slightly.  

Anyway, here are some pictures to help document (mainly so I can refer back to when I forget how what I did). 

Additionally, some noticings:  the original glass was the two-ply, 1/4 inch.  The replacement was not, it was more of a single, thinner glass.   Overall, the job was not as difficult as I had built it up to be.  Of course, when handling the replacement windshield I was so thinking I was going to break it (hence the no pictures of that glass).  I'm very pleased with the result and it's

The finished product!


Installing the locking strip, Windex was helpful. 

 The seal spreading tool sourced from amazon.

With the windshield installed


Placing the window within the bottom groove, and gently sliding it down.
Continuing to adjust glass within the seating.

 Long way to go still.


Seal glued, I used gorilla super glue, with the ends pushing together, it created a nice seal.

 Not pictured is the seal being fitted around the new glass.  This is the new seal being fitted to the car.

 This is the seal received from Kevin.


The crack in the window.

 
 ...and so the removal begins.  Simply cut away with a razor blade.


Thursday, December 28, 2017

UPDATE: June 2021 - Brake Upgrade: 2000 Honda Civic Brake Calipers & Rotors Mounted Successfully

Shortly after doing my conversion, I found out from a Facebook group of 2nd Gen Civic owners that it would be possible to mount up a newer civic model brake caliper to house larger pads, thus increasing brake performance. 

The information they gave me was to find brake calipers that fit a Honda Civic 1996-2000 and the calipers would mount onto the 1983 Honda Civic knuckle. 

I found this at a local Pick 'n Pull: A 4-door 2000 Honda Civic LX, KA 5MT and I took the brake calipers and rusty ol' rotors as well.

After removing the 1983 Civic calipers, I successfully mounted these 2000 Civic calipers and rotors to be used on my 1972 Honda N600 (with modernized brakes), what a thought!  And the 1983 Civic wheels still fit around the calipers.

Here are some pictures:


UPDATE June 2021:
This summer has allowed me to spend more time with driving the n600.  

Since doing this upgrade and bypassing the booster, I had always been interested in the possibility of returning to using the original booster with mod.  The reason for this is because, while the brakes did work, they weren't really what I had hoped they'd be.  Now, looking back at the post and even viewing these pictures, I've learned a lot, paid a lot, and yes, even enjoyed the critical think a lot.

So, to get the obvious out of the way... yes, in the above pictures... and how come no one pointed this our... the calipers were indeed installed upside down, with the bleeder nut on the bottom.  <-- simple, no duh mistake that I made in my noob status... live and learn... lesson learned.  The reason I made this mistake is because I went with the R & L that are stamped on the calipers themselves and how they indeed came off of the Civic.  What I failed to recall was how I had swapped and modified the knuckles from the '83 Civic.  Because of this knuckle reversal, the calipers also needed to be swapped in order to fill the piston chamber with fluid so I wouldn't have to pump them so much to get them to fill, engage, and ultimately stop the car.  

And, yes, that problem just described was the problem that lead me down the path to 1) get the original Master Cylinder rebuilt... chaching $$$, and the booster to get rebuilt, CHACHING!!$$!!!.  I was lucky enough to have Rick Morris supply the rebuild kit for the cylinder and Apple Hydraulics for the booster rebuild.  Very excited with the possibility of having superior braking power, I reinstalled the newly rebuilt parts, only to find the same problem... lots of pumping to get the brakes to engage.  

After continuing to brainstorm, problem solve, and troubleshoot, my brother was able to help me understand that the bleeder nut needed to be installed on top.  In the meantime, I was also convinced that maybe the upgraded calipers--from the 2000 civic--needed to have the master cylinder from the same vehicle.  So, I purchased a new one, modified it to fit (similar to previous post).  Still the problem persisted.  

After driving it around more and more, pumping and having my hand close to the emergency brake, I noticed there was some "play" in the time when I pushed the brake to when it actually engaged with the master cylinder.  Upon further inspection, this was being caused by the original brake pedal push rod was not long enough, and so I'd have to push the brake pedal down about 2 inches before the brakes would begin to engage.  So, found an adjustable brake push rod, installed it.  I needed to enlarge the mounting hole on the brake pedal, just drilled it through with a slightly larger bit.  


Friday, March 14, 2014

UPDATED: 9/2021 - Brake Caliper & Rotor Conversion - 1972 N600 to 1983 Civic

Back in October, and after driving on the highway, booster-less, I found myself wondering if there was something I could do to help modernize the brake performance and ultimately get myself safer behind the wheel of this N600.  Also, the tv shows on the "Velocity" channel didn't prevent my mind from wondering either...  So, after studying the wheel hub of the n600 the gears in my head started spinning:


I decided to head out to my local pick 'n pull to see what other steering hubs looked like and to see if any could be adapted on the n600.  Well, after considering a later 80's civic, their wishbone lower suspension made it impossible, well, with my capabilities, anyway.  So, I found an '83 5 door, and got to work.  I removed both brake calipers, rotors, and knuckles and even got the axels, which were not my intension, but I couldn't separate them.  The other bonus with this civic was that it had the complete set of wheels.  So, I had to!  Also, I decided to focus my attention on the front brakes first because of the fact that it had the most complications, and I figured that if I was to have success with the front, then the rear would be more simplistic.


So, I got to work on removing the '72's steering knuckle, and brakes.  I found out that the driveshaft is actually pressed in, so removing the cv joint was actually easier to get it out:


Once out, I did a test fit with the new steering hub.  After cleaning up the knuckles of the '83, I found that I could get them to fit if I reversed the sides, (L on the right and R on the left) to make clearance for the knuckles' tie rod mounting location (I later sliced it off to avoid any contact with the sway bar):
Also, I took this time to clean up the suspension and replace worn and damaged rubbers.  Thanks Bill Colford and Ray Cave for the replacements!  


Now at this point I was super excited because everything was fitting, and I kept asking myself, how come no one else had done this?  Then, I tried adapting the cv joint from the '72 to the '83 --- :( Nope, wouldn't fit, different diameter and teeth on the axle shaft.  So, I thought, how can I get this to work?  My first thought was to just find the right cv joint roll & cage and ball bearings that would match the two makes, but then thought, right, that would be like finding a needle in a haystack, or like finding a t360 in the states... haha! 

So, I had ran into my first set back.  I talked to a few people, quite embarrassed at what I was asking, they probably though I was crazy, but then I contacted Bill at Driveshafts by Frank Wallace, here in San Francisco.  I took him all the stuff that I was working with and he helped direct me to the next option:  split the axles, graph the inner '72 with the outer '83, weld a sleeve over 'em, rebuild the cv joints and mount them back up.  So, that what we decided to do!

A few days later, after some truly awesome craftsmanship, I had the hybrid axles:

Next was to get them clamped and in place!

With them in place and functioning, I then went on to rebuild the brake calipers, install and bleed them and move on to the wheels.  

Now the thing that I always knew from the beginning of this project that when I went from the N600 hub to the civic hub would be that I would be leaving the land of 110mm PCD and would be arriving at the more common 100mm PCD for the rims.  After watching Mark P. Hatten's video of an N600 on 13" wheels, I knew that I'd have to find a set of the 175 50 R13 tires that, again, I knew would be difficult to acquire.  So, back in December, I started putting feelers out to see if I could find a set, and after being directed to a VW forum, I found a set of 4 here in the Bay Area.  So, I picked them up and had my Sumitomo tires ready to go.  This specific tire size means that they are about an inch larger in diameter than the original stock 10 inch wheels.  Also, they are thicker, and beefier than the original stock wheels, too.  Thanks again Mark! and Simon!


I decided to stick with the stock '83 rims because I thought they had a throwback appeal to the original N360 look.  See my first post.  Once I mounted them in the front, however, I ran into my second snafu.  The tires rubbed ever so slightly on strut's tie rod mount.  With regards to mounting the rims on the rear axle, I had already made the decision of installing 20mm wide wheel adaptors that would convert the 4x110mm lug pattern to the 4x100mm pattern of the civic rim. I found the pair from: Adaptit 

Since I needed to provide a little bit of space in the front, I just decided to add 10mm wide wheel spacers to the front.  I found some great quality ones on ebay from ebayseller: Tuneshop

So today, with the wheels in non-rubbing order, I decided to go for a test drive.  Things went smoothly but I need to work on the alignment a little more.  But other than that, braking is much better now with the larger brake calipers and I like the 'alternative' look of the sedan:  see for yourself.


Update 9/2021:

Since doing this upgrade, I've had a few issues that I've been working to resolve, and finally, I am able to update the blog.

For this update, I want to specifically focus on a step that I missed during the original mod regarding the seating of the strut into the knuckle.  As you can see from the pictures of the original posting, I didn't notch the knuckle with clearance for the "teeth" of the strut to slip into and to lock.  The result was very unstable suspension, especially noticeable when going over speed bumps.  I would describe it as leering or jutting one way or the other, left or right, whichever wheel caught the bump first.  This is something that I was "living" with as I was just cruising around town.  However, I alway became concerned especially going over uneven pavement or the occasional pothole.  As you can imagine, doing so at higher speeds... we'll let's not go there.  So, with the thought of wanting to take the N600 on a longer ride (down to Santa Cruz on Hwy 1), and having a fellow N600 owner that has followed this blog and has completed his own mod, this situation definitely needed to be taken care of.


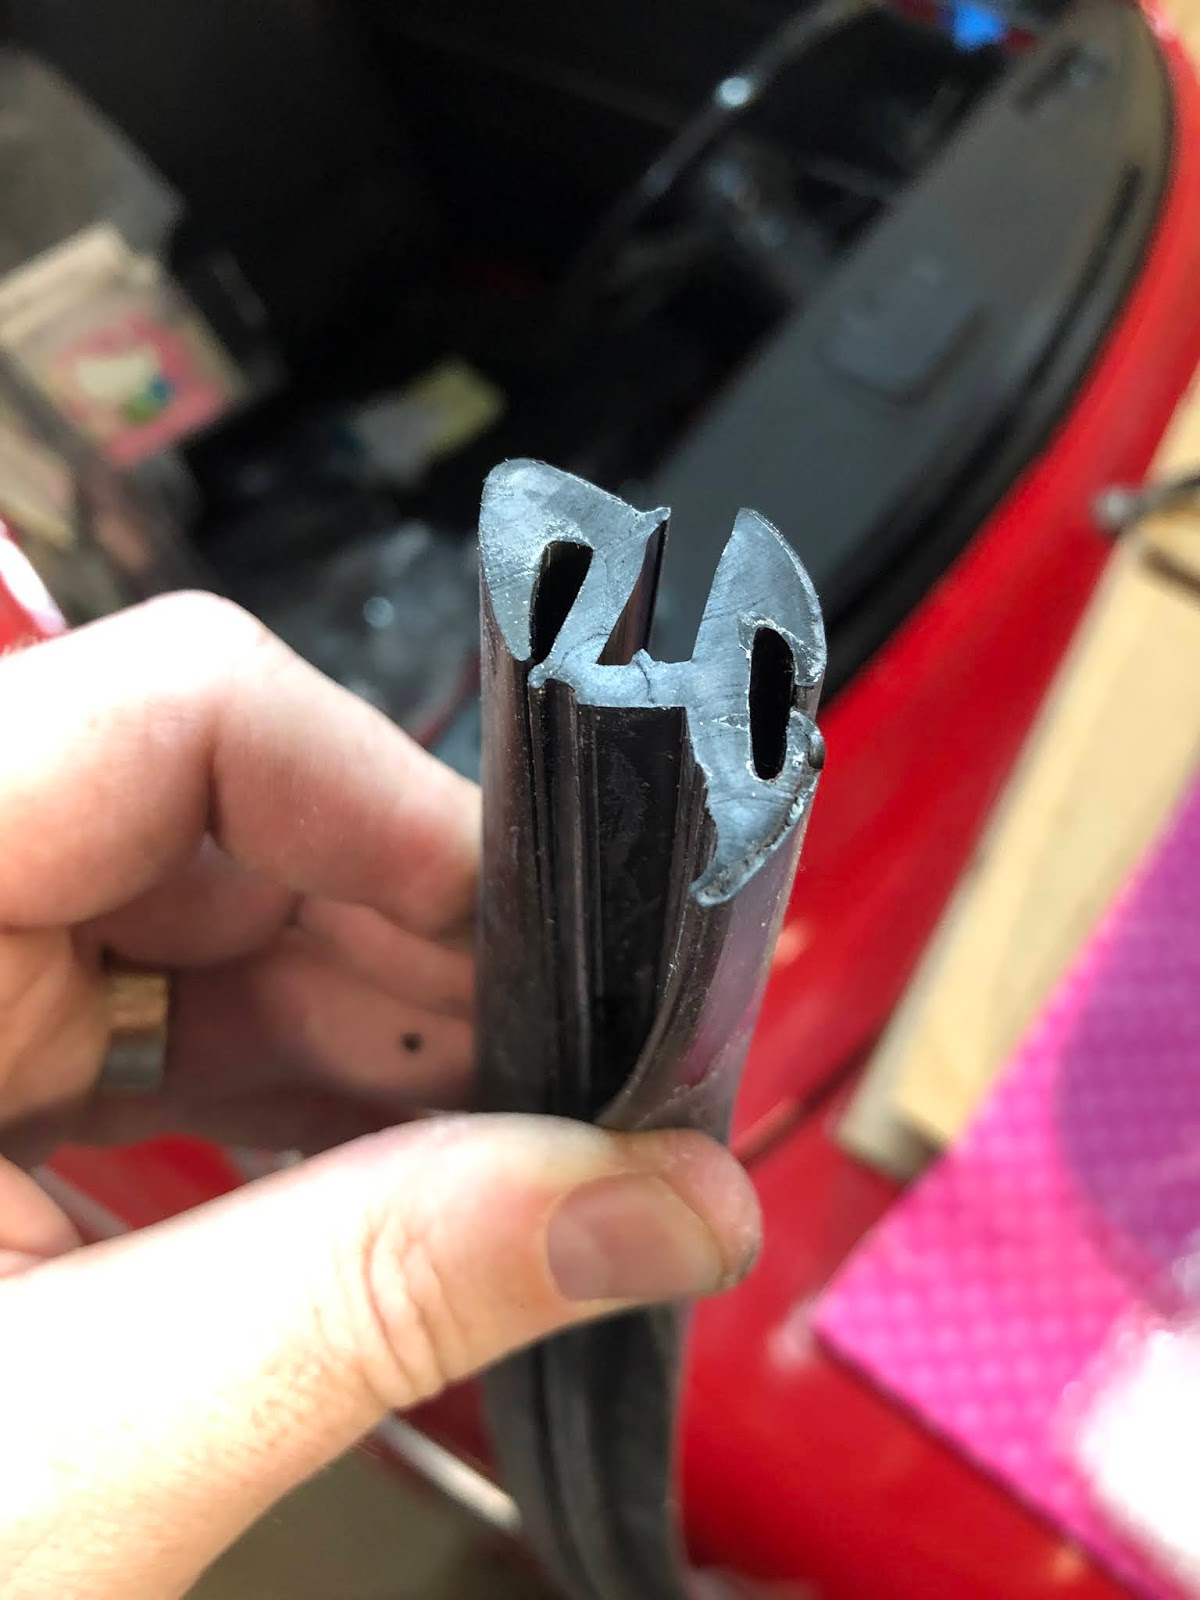
This is showing the strut as it sits inserted into the top of the knuckle.  See the gap and how it is resting on the notches / "teeth".  


I marked the locations of where the teeth rested on the top.  I used a paint pen that bled all over so I had to opt for the permanent marker.  I removed the left & right side axels at the engine in order to push the knuckle down to release the strut.  Since I recently replaced the front struts with some NOS struts, they slipped out with just a bit of pushing down with my foot.  Although it was still on car, I was able to start with the dremel and just cut out the section to allow for the teeth to "fit".  


Here's a photo of my "worst" cut.  It fit much better on the opposite side.  If I were more concerned with it, I would have removed the strut and knuckle from the car in order to get the best measurement and to be more accurate.  However, you get the chance to learn from my attempts.   Anyway, this is the passenger side, the driver's side was done after, and it was a better fit too.  


Additionally, I wanted to show a better photo of the mounting of the brake caliper.  As you can see, between the caliper and the mount on the knuckle, I placed a washer I had.  However, it has since been explained that this type of washer could heat up and affect the closing of the brake "clamping" and the mounting bolt could loosen up.  So, I'll be eager to create a spacing plate by outlining the mount surface area on a caliper spacer and trim and file down to be a better fit.


Finally, my last bit of advice on this caliper conversion is to be aware that the knuckle order was switched, but the calipers need to be mounted where the bleeder screw is on the TOP.  I know for some of you reading this, this seems to be a "no brainer" but for me, the novice, I had them mounted upside down and had the hardest time figuring out why I couldn't bleed my brakes.  Well... lesson learned.


Saturday, October 12, 2013

Honda N600 Sedan Replacement Carpet 80/20 Loop Cloth Bound

It's pretty difficult to find a 40+ year old vehicle with useable, intact upholstery.  My N600 has suffered from ripped, torn, worn, dirty, dusty but original carpet.  Although not completely bad, it had wear spots that allow a view of the floorboard.  So out with the old and in with the new.  Unfortunately, there isn't a replacement set for the original 3 piece carpet set.  Instead, through a few recommendations, I opted to go with a 80/20 loop 5 piece carpet set with a cloth binding.  It had been mentioned that this was closest to the original look and feel of the stock carpet set.  With much thanks to Mike O'Conner, I was able to place an order with him to have the new delivered.  But first I had to replace some of the missing rubber plugs.  I found these replacements from Lowe's:


Here are the panel plug replacements through the floor board.


These are the replacements from Lowe's.  I went with the 1 inch, but it was a tight fit.  I was able to get it in with a hit or two from a rubber mallet.  I imaging the 7/8 inch to fit too.


After a search for replacement fasteners, I ended up using the original.  After removing them from the original carpet and cleaning them up, they looked just as new on the new carpeting.

I started with the driver side front wheel well.  The carpet set came with some padding, and I added a extra layer to make everything look smooth.

Even though there were slight discrepancies with the pattern of the new carpet, I made some slight adjustments and agree that the new set looks far better than before.  This picture features the wheel cover section, the driver's side floor mat, and the section that rests over the middle hump.  Although not shown in the picture, the floor mat is a little too long as it reaches under the seat, but not long enough at the top to stretch completely up and attach above the gear shifter.  I imagine this could be corrected with a recut with the curve near the wheel well. 

However, the overall look is astounding!  I am very pleased!  I didn't get a picture of it, but the kit also included the rear seat and under seat flooring section.


In this picture, you can see the small gap between the wheel well and the passenger side floor mat, but with some movement, it's hardly noticeable.